Introduction
What is a planisphere?
It is a map of the sky. But, it is a very special kind of
map because it is also a type of mechanical computer that
can calculate the position of objects in the sky for any
date and time.
I have an app on my smartphone that does that. Why
would I want to use a planisphere?
There are lots of reasons to use a planisphere instead of a
smartphone or computer. At the top of the list is ‘dark
adaptation’, or night vision. You see (pun intended), it
takes over half an hour in the dark for your eyes to adapt
to the low light levels. Once adapted, your eyes become
very sensitive to even the dimmest light sources making it
possible to see faint objects such as galaxies in your
telescope. One brief look at that bright screen on your
phone, and you’re blind. Amateur astronomers use paper
charts and dimmable red flashlights in order to preserve
their dark adaptation so they can see ‘faint fuzzies’ in
the sky. If you are observing with a group, you might
notice that some of the more serious observers get a bit
cranky about white lights on the field. Another reason to
go low-tech and use a printed star chart is convenience.
There are no batteries to charge, no cables to get tangled
up in, and no heavy computer to lug back and forth in the
dark. You don’t have to wait for a planisphere to boot up
before you get started. But, you will have to adjust it for
the current date and time, that takes just a few
seconds.
How to use a planisphere
Let’s get started. Hold the planisphere up in front of you and take a good look. You will see that it is constructed from two flat disks that are joined together with a center pin. You should be able to easily rotate the top disk so that any part of the star chart printed on the bottom disk is visible through the transparent window. That star chart on the bottom disk shows the whole sky, even the half that is not currently visible because it is below the horizon. The top disk covers up the part of the sky that is below the horizon, with the transparent window showing only that part of the sky that is currently visible. OK, let’s set the date and time. Look closely around the perimeter of the top disk. You should notice that the months of the year are printed around the outside edge. Below the month names are numbers, representing each day of the month. Take a moment to find the current month and day. Got it? Great! Now rotate the top disk until the current date aligns with the current time of day printed around the edge of the bottom disk. You don’t have to be exact. Getting within an hour of the current time will do just fine. Congratulations! You just programmed a mechanical computer.
 Now, hold the planisphere directly above your head and look
at the chart through the transparent window. Try to imagine
that the window is not flat, but rather a large bowl
curving up toward the sky with the stars on the chart
printed on the inside of the bowl. Imagine the rim of that
upturned bowl extending down to the ground all the way
around you forming the horizon. The edge of the window is
the horizon, encircling you, and the center of the window
is the sky directly above you. Stars that are high in the
sky are closer to the center of the window. Stars lower in
the sky are closer to the edge of the window. You can lower
the planisphere now and give your arms and brain a
rest.
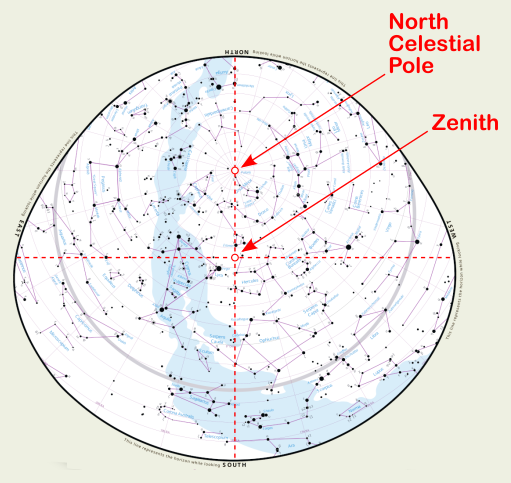
 Note
that the rotational axis of the planisphere is
not at the center of the window (the
zenith), rather, it represents the north celestial pole. It
is the location where you would find Polaris, the north
star. The center of the window represents the Zenith, or
the point in the sky that is directly above your head. This
point is not marked on the planisphere, but you should be
able to estimate the zenith point by imagining a line
running across the window from North to South intersecting
another imaginary line running across from East to West.
Objects near this point on the sky map will be directly
overhead in the sky.
Take a look around you at the actual sky and face North. Now, take a closer look at the edge of the transparent window on the planisphere and notice that the compass directions (North, South, East, West) are printed there. Hold the planisphere so that the word ‘North’ is towards the bottom. South should be at the top, East to the right, and West to the left. It may seem like you are holding the planisphere upside-down. Don’t worry, the planisphere is meant to be rotated to any orientation, depending on which direction you are facing. For this exercise, we need to be facing North.
 Now,
take a look at the star chart and find the ‘Big Dipper’. It
is an easily recognizable grouping of stars in the
constellation Ursa Major. Once you have found it, make note
of its orientation in the transparent window. Is the handle
pointing down towards the ground, or up towards the center
of the window? Now look at the real sky to the north. The
Big Dipper should be there in the sky, oriented in the same
direction as it was on the chart. If it takes a couple
tries to get it right, that’s OK. You’re learning a new
skill. Feel free to go back to the beginning, set the date
and time, and try again. Finally got it? Congratulations!
You have learned the basics of using a planisphere.
Now that you have successfully located your first object on the star map and translated that onto the actual sky, let’s practice with something from a different part of the sky. Turn the whole planisphere 90 degrees in your hands so that the word East is printed near the bottom of the window. North should be to the left, South to the right, and West near the top. Identify a constellation with some bright stars near the bottom (East) of the chart. See if you can find that same pattern of stars low in the eastern sky just above the horizon. This will be the same procedure you used to find the Big Dipper, just with you and the planisphere both rotated 90 degrees. Keep looking east and identify a constellation higher up on the star map near the center of the window. Remember, the center of the window is the center of our up-turned bowl that represents the dome of the sky. So that constellation near the center should be near the zenith, almost straight overhead. Can you find it in the actual sky? Good Job!
As you were looking for that constellation from the center of the chart’s window on the real sky, you may have come to an important realization. If an object on the chart is above the center of the window, you would have to look for the object in the real sky even past the zenith. You would have to look straight up, and keep bending your neck even further still… the object is behind you! Rotate the planisphere 180 degrees in your hands so that the opposite horizon is near the bottom, then turn around and try again. The constellation should now be easier to view without straining your neck. It takes a bit of practice, but after a few tries you should be able to choose any object on the chart, see which direction on the horizon it is closest to, and turn to find that object in the sky.
 Once
you have mastered the procedures above, you are proficient
enough to orient yourself under the sky and locate the
constellations using almost any planisphere you may
encounter. There is much more you can do with the Messier
Observer’s Planisphere that you cannot do with ordinary
planispheres or paper star charts. Follow the guides on the
web site to learn how to use its more advanced
features.